Demystifying Azure Security - Azure Policies - 1 - Basics
@20aman Dec 10, 2017This blog post is part of the Demystifying Azure Security series. All posts in the series can be found here: Demystifying Azure Security - Series Index
Azure Policies are a great tool to make access to Azure more secure by prohibiting certain operations and enforcing various rules in your environment. The policies make your environment compliant and ensure that you adhere to the service level agreements and standards set within your organization. If the end user tries to deploy a resource violating the policies then the deployment fails at the validation step ensuring that your environment remains compliant. If you already have resources which are not compliant then you will be able to review those and take necessary actions.
Examples of Azure Policies
Here are a few of most commonly used policies:
- Restricting the Allowed locations where a resource can be deployed. You can restrict the allowed locations where resources can be deployed to the ones that are closer to your geographic location. This also ensures that the users within your organization can't deploy resources to noncompliant locations.
- Enforcing a Tag and it's Value. E.g. You have a Resource Group for the Finance department. You want to ensure that any resource deployed in that Resource Group should be tagged with a "CostCenter" and a specific value for that cost center. You can enforce this using a Policy.
- Not Allowed Resource Types. Using this policy you can prohibit the deployment of certain resource types in your environment.
There are various other built-in Policies. You can also create your own policies which we will discuss in more detail later.
Scope where a Policy is Assigned
A Policy can be assigned at the below levels:
- Subscription level - Applied to all Resource Groups and Resources within the subscription
- Resource Group level - Applied only to the Resources within the selected Resource Groups
Exclusions: In addition to the assignment scope, you can exclude certain Resource Groups or individual Resources from the Policy assignments. The Policy will be applied to all the Resources in the scope except the ones excluded by defining the Exclusions.
How are Policies different from Role-Based Access Control (RBAC)
Through Role-Based Access Control (RBAC), you focus on the role and scope of access that a user can have in Azure. You provide the access control (IAM) within Azure for Subscription, Resource Group or an individual Resource. You define a role for the user/app/group like Contributor, Reader etc. You can use the built-in roles or can define custom roles.
With Policies, you focus on the properties of the resources with which the user can work at the defined scope. You define what properties are allowed and what is restricted. You can use the built-in policies or can define your own.
E.g. Through RBAC you define that a particular user has Reader role at the subscription and Contributor role at a particular Resource Group. This will mean that the user can view all the resources in the subscription but can only modify or create resources in the Resource Group where he has Contributor access.
Now if you define a policy which restricts the type of resources deployed ( as discussed in the examples above), the user will not be able to deploy the restricted resource types, even though he has contributor access to a Resource Group.
Accessing Policies in the Azure portal
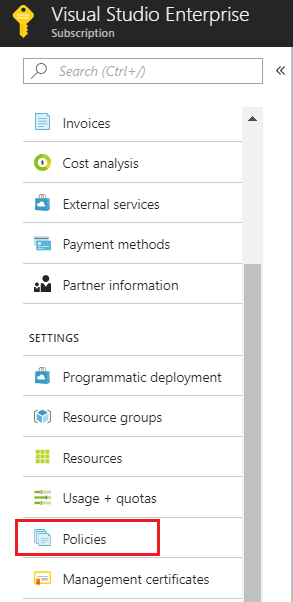
To access the Policies in the Azure portal:
- Navigate to Subscriptions (via All Services or the navigation sidebar)
- Select the subscription for which you want to view the Policies
- Scroll down to the "Settings" category in the menu of the subscription
- Click on "Policies" to access the policies in Azure

We will be discussing more about the Azure Policies in later blogs.