Demystifying Azure Security - Creating a Custom Policy - Part 3 - Defining your Custom Policy
@20aman Jan 14, 2018This blog post is part of the Demystifying Azure Security series. All posts in the series can be found here: Demystifying Azure Security - Series Index
As discussed earlier, the policies provide a way to control what is allowed and what is not allowed in your environment. Earlier we looked at how to view the definition of existing policies and discussed the structure of the policies in detail. Now it's time to put the knowledge together and define a policy.
Getting the JSON ready for the Policy Definition
Have the JSON ready for the Policy Definition. If you are going to deploy the policy via Portal then all you need is the Policy Rule portion of the definition. For this post, let's use the sample policy definition for "Only allow a certain VM platform image" located here: https://docs.microsoft.com/en-us/azure/azure-policy/scripts/allow-certain-vm-image
Various other samples are provided by Microsoft at this link: Templates for Azure Policy
This sample policy, enforces the end users to use only a certain version of the Ubuntu only.
The policy definition looks as below:
{
    "type": "Microsoft.Authorization/policyDefinitions",
    "name": "platform-image-policy",
    "properties": {
        "displayName": "Only allow a certain VM platform image",
        "description": "This policy ensures that only UbuntuServer, Canonical is allowed from the image repository",
        "parameters": {},
        "policyRule": {
            "if": {
                "allOf": [
                    {
                        "field": "type",
                        "in": [
                            "Microsoft.Compute/disks",
                            "Microsoft.Compute/virtualMachines",
                            "Microsoft.Compute/VirtualMachineScaleSets"
                        ]
                    },
                    {
                        "not": {
                            "allOf": [
                                {
                                    "field": "Microsoft.Compute/imagePublisher",
                                    "in": [
                                        "Canonical"
                                    ]
                                },
                                {
                                    "field": "Microsoft.Compute/imageOffer",
                                    "in": [
                                        "UbuntuServer"
                                    ]
                                },
                                {
                                    "field": "Microsoft.Compute/imageSku",
                                    "in": [
                                        "14.04.2-LTS"
                                    ]
                                },
                                {
                                    "field": "Microsoft.Compute/imageVersion",
                                    "in": [
                                        "latest"
                                    ]
                                }
                            ]
                        }
                    }
                ]
            },
            "then": {
                "effect": "deny"
            }
        }
    }
}
Look at the policy rule section. Let's look at various sections more closely.
- if condition defines the policy condition
- allOf ensures that all the conditions must be true
- field type is specified as Disks, Virtual Machines and VM scale sets under Microsoft.Compute
- Next section defines a nested condition, which evaluates true if actual VM image used is not equal to combination of all of the conditions specified.
- then section defines what should happen. In this case it says to deny the operation, i.e. the VM provisioning will fail with validation error for not conforming to the policy.
Note that there are no parameters used in this policy definition.
Defining Policy using Portal
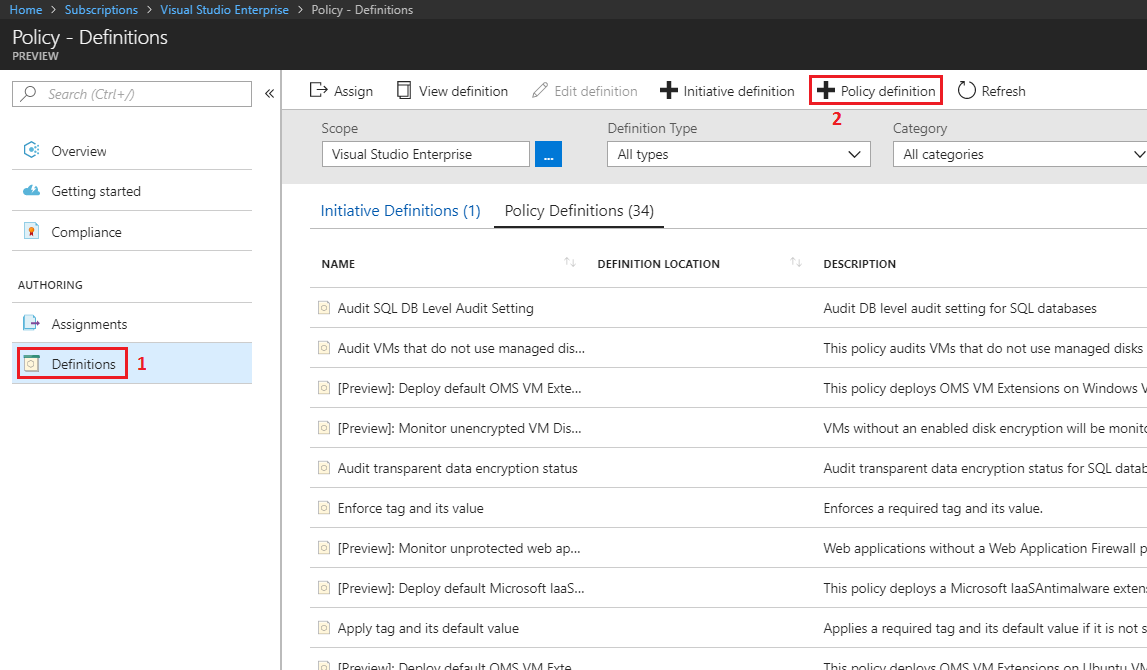
For defining the policies via Azure Portal, navigate to the Policies under settings of your Subscription. Click on the Definitions and then click on "+Policy Definition" at the top.

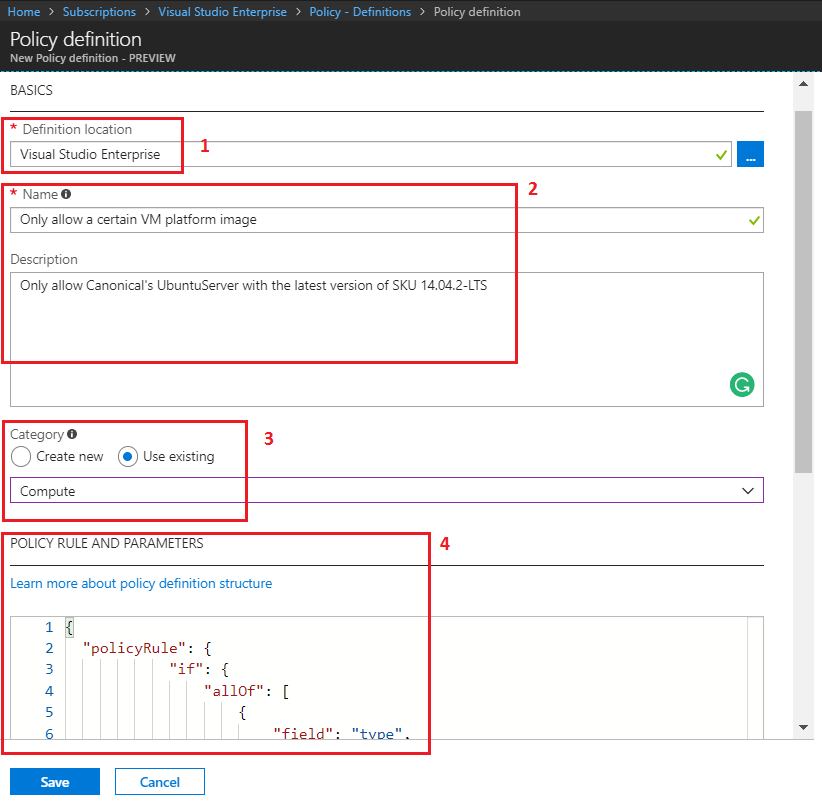
A new blade will open where you can define the policy. Provide the details as follows:
- Provide the policy definition's location. This will be your subscription in which you want the definition to exist.
- Provide a Display Name and Description of the policy. Try to be as descriptive as possible
- Either create a new Category for the policy or use one of the existing ones
- Copy and paste your policy definition. In the portal, only provide the "policyRule" section.
The section for policyRule will look something similar to below.
{
    "policyRule": {
      all content here
    }
}
Hit Save to create the Policy Definition. You can now start assigning this policy in your environment.
Defining Policy using PowerShell
Ensure that you have latest version of Azure PowerShell installed. Then using PowerShell to deploy the policy is as easy as executing below two cmdlets:
- New-AzureRmPolicyDefinition - to create the policy definition
- New-AzureRMPolicyAssignment - to use the policy and assign the policy at a scope defined
Store the policy in a json file on your computer. Ensure that you only save the "if-then" condition in curly parenthesis. This will be used as an input to the cmdlet. The file should look similar to below:
{
            "if": { <<content here>>},
            "then":{ <<content here>>}
}
To create the policy definition use a code similar to below. Ensure to update the file name and path as per your environment.
$definition = $definition = New-AzureRmPolicyDefinition -Name "RestrictingUbuntuVMVersion" -DisplayName "Restrict Ubuntu version for VM Deployment" -Description "Detailed Description here" -Policy "C:\temp\CustomPolicyDefinition.json"To use the policy, do the assignment using a code similar to below:
$assignment = New-AzureRMPolicyAssignment -Name <customAssignmentName> -Scope <SubscriptionId> -PolicyDefinition $definitionThat is all there is to defining and using your custom policy.