Demystifying Azure Security - RBAC Roles
@20aman Dec 20, 2017This blog post is part of the Demystifying Azure Security series. All posts in the series can be found here: Demystifying Azure Security - Series Index
Azure RBAC Roles are a great way to securely provide access to users with limited actions in Azure. The focus is to provide only the access necessary so that an account in your organization doesn't have more access than needed. In case the account gets compromised, this will ensure that does not leave your environment too much vulnerable. This means that if you grant an employee access to manage Virtual Machines in your environment, that employee can't alter the virtual networks by mistake or have any access to delete the storage accounts in the environment.
Roles Hierarchy
The RBAC Roles can be assigned at the following three levels in the order of hierarchy:
- Subscription
- Resource Group
- Resource
Any Resource in Azure, must belong to a Resource Group (under the ARM model). And every Resource Group in Azure must belong to a single subscription.
If a person is assigned scope at Subscription level then he/she will get access to all Resource Groups and to all resources within those resource groups. Next, if a person is assigned access at a Resource Group level then they will automatically get access to all the Resources within that Resource Group. Finally, if a person is provided access only to an individual Resource then they will get access only to that Resource.
Built-in Roles
There are various inbuilt roles for this purpose like:
- Contributor - create and manage but can't grant access to others
- Reader - can only view
- Owner - full access
The complete list of Built-in roles can be viewed here: Built-in roles for Azure role-based access control
Viewing and Adding Access
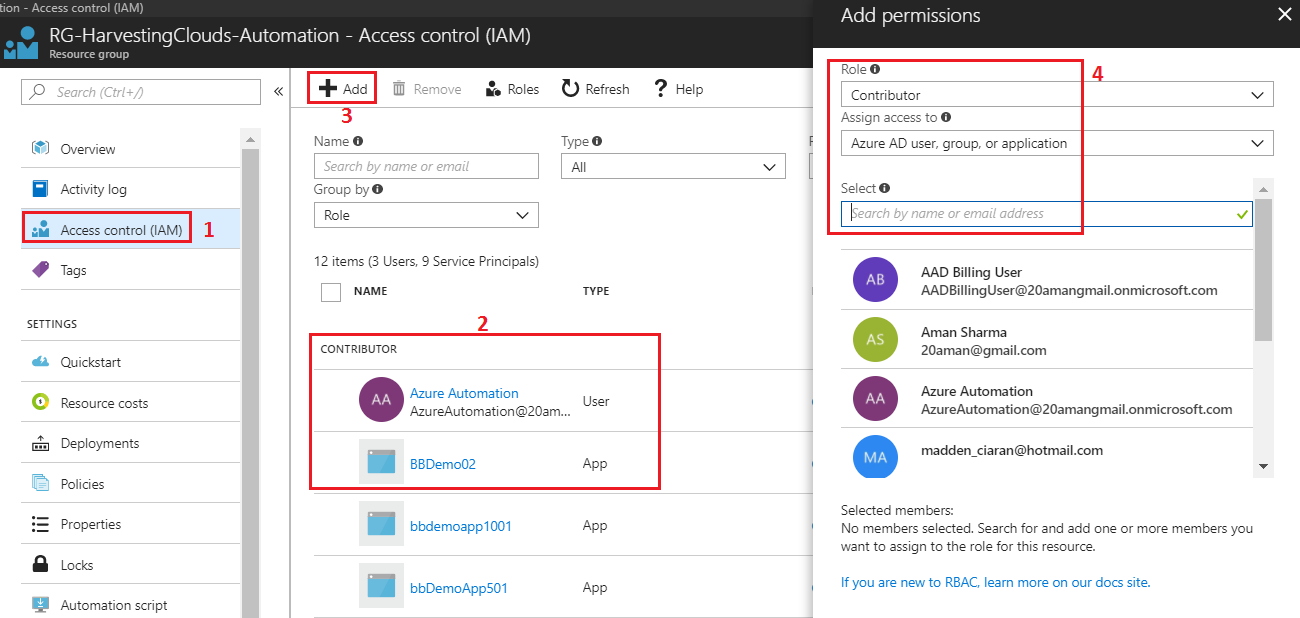
To view or Add access, first decide the scope where you want to provide the access. Select the scope, e.g. a Resource Group on which you want to view existing access and grant the access to someone. Then follow these steps (as per the image below):
- Click on "Access Control (IAM)" to access the RBAC access control
- View the access in the center area. Scroll down to view all type of roles and Users, Groups or Apps with the access
- Click on "+Add" button, as shown below, to add access to a new user, group or application
- In the new popup blade, select the Role (e.g. Contributor), Assignment scope and name/email address of the user or app to whom you want to grant the access. You can select multiple users/apps as well.

Within each subscription, you can grant up to 2000 role assignments.
Learn about creating Custom RBAC Roles here: Demystifying Azure Security - Custom RBAC Roles